Tuesday, 29 March 2011

Grow your own... mushrooms


This was my very first grow-your-own-edible-stuff experience. 

I came across a cheap mushroom growing kit in one of the local supermarkets.  It was priced at next to nothing, and the idea seemed funny, so I thought I may give it a try.  Worked?  Worked!  Kinda... 

As you can see on the picture above, I've achieved at least partial success.  You can grow real giants if you want to!!! 

The manufacturer tells you not to let your mushrooms grow bigger than 3-5 cm, but I completely ignored this rule.  They grow irregularly, and I didn't really see any point in harvesting a single piece, so I just let it be. 
Discovery?  There's much more food on a big mushroom than on a small one.

Watching the mushrooms grow was real fun.  I'm not sure now how exactly I had imagined the process, but I know that it must have been something different than it is in reality, because I remember being very surprised.  Fascinated, too.

This may not be the case with all the kits, but mine did not yield too much crop.  I've harvested maybe 10 mushrooms in total.  Pictures of white buttons fountaining out of the box will have to remain in the fantasy world, I'm afraid. 

I've had a delicious pizza with what I got, though :).  Somehow they seemed tastier than shop bought - or is it just grower's pride?

Anyway, this story does not end with happy end.  My plantation fell victim to some kind of mould.  Even two kinds of mould.

One, whitish, showed up on stumps left after harvested mushrooms.  Maybe you're supposed to remove them completely when picking, I don't know, but they tend to cluster and I didn't want to remove three tiny mushrooms when harvesting one grown.  So I simply cut them at ground level and soon the mould showed up.

Second is funky blue and entirely my fault, I'm afraid.  Don't repeat my mistakes -

DON'T WATER YOUR MUSHROOMS!!

They are supposed to be watered at the beginning of growth process, after that care instructions are silent.  My plantation looked very dry, crops somehow diminished and I thought water might help. 

Wrong.

The blue mould showed up a day or so afterwards and it doesn't look like disappearing.  I've given my mushrooms a chance, thinking that maybe somehow they will clean themselves up, but no joy.  Mould grows, mushrooms don't.  Hereby I announce today as being an official Goodbye To Mushrooms Day.

There is a silver lining on my mushroom cloud.  The kit comes in a handy plastic box that will be a fabulous container for my strawberry plants.  That is, when they finally get bigger than a pinhead.  But that's another story.


Monday, 28 March 2011

Sunday, 27 March 2011

Raspberry bush enigma


Once the news of my new-found gardening passion spread around, an unusual gift came my way.  A raspberry bush!!! 

My first feelings were mixed.  It's fine to grow lettuce, ot even tomatoes, on your windowsill, but a raspberry bush??? 

Then I thought - and why the hell not?

I bought cheap builder's bucket and into the soil it went.


I followed my friend's idea to sow some flowers in the bucket as well, just to fill up the space.  So far no joy...  They don't show their green teeth yet.

But the raspberry thrives and is well, growing more leaves with every day.

I start thinking that this experiment is going to work and soon I'm going to enjoy home grown raspberries!  Can't wait.

Oh, if you were wondering what the 'thing' in the bottom right of the picture is...  Here's my special recipe for liquid feed:

1. Get a glass/plastic/metal container onto your balcony.

2.  Put something in it.  I have no idea what was originally in mine.  Looks like some organic matter now...

3.  Let the rain pour inside.

4.  Leave for a year or so.

You end up with murky, greenish substance, that I'm sure is full of nutrients.  I'm pouring it into the raspberry's bucket regularly and it grows like crazy.

Might be the secret ingredient???

P.S. I hate blogger.  I was going to post step-by-step pics of how my raspberry grows (I'm really bad, aren't I?), but they disappear as soon as I click publish.  Maybe at least one will get through...  It's how the plant looks now.

P.S. 2 No, it won't get through.  So no pics in today's post (grrrrrrrrrrrrrr).  Promise I will post the pics as soon as things go back to normal.

Saturday, 26 March 2011

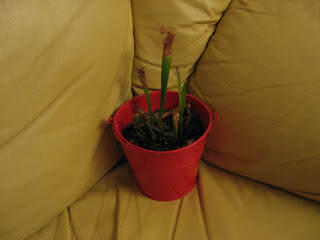
Meet The Frog


Not exactly garden-related subject today, but a plant is a plant. 

Let me share with you another one of my tiny fixations - developing passion for carnivorous plants.

The one on the picture belongs to pitcher plant family, I'm not even exactly sure what species it is and I'm not that keen on finding out.  As long as it survives and catches flies, I don't care too much about it's identity.

I name all of my houseplants, at least those that are not supposed to be eaten at some stage, but to stand there and look pretty.  So my shelves are graced by Troll, Tiger, Frog and, until recently, a rose named Lasarus.  Lasarus got cut down and tended to grow back (hence the name) but one day it simply refused to resurrect.  No harm done, its pot immediately got recycled as a growing space for dill.

The Frog, as you can probably imagine, got its name from its habits.  Just like the green, croaking creatures, it catches and consumes flies.  I also have a soft spot for the word itself, one day, for no reason at all, I started collecting words for 'frog' in all the languages I could and I must have gathered something about 30 now.  The more exotic pearls from my collection include Welsh, Finnish, Afrikaans, Suahili, plus the whole load of European languages with which I am most familiar.  If you happen to know some frogs that could enrich my collection, please, please, please email me!!! 

Back to the plant, though.

I got it as a present some time last autumn, and it wasn't long before the pitchers started to dry off.  I attacked local florists for information on how to care about it.  As it usually happens, no two people seemed to agree on the correct way of making a carnivorous plant survive.  One lady told me it should be kept in very wet environment, as in the wild it grows mostly on bogs and marshes.  I increased the amount of water given to the plant, but no joy, the leaves kept going brown. 

Only after a while I found out that this type of plants basically goes to sleep in winter.  If you grow it outside, simply leave it out there (unless there's really sharp frost, in which case the plant needs to be covered with something to protect it from the cold) and it will grow back in the spring.  But what if your plant lives indoors?

I browsed the Internet, but no option seemed right for me.  People suggested tool sheds, cellars etc, and I simply don't have use of such places.  Someone even advised to wrap it up in something wet and store away in the fridge.  Imagine that!  No, I couldn't do such a thing to my Frog. 

My good fairy of this story appeared to me as another florist lady, who finally gave the advice that worked.  She told me to significantly cut down on watering and to water it only with warm water. 

You know what?  It worked!  Frog survived the winter.  You can see for yourself that she still doesn't look like much, there's still those dry bits all over the place, but recently she started sprouting new green leaves and now she seems to show even more with every day.  Hurra!

Oh, and as for the more meaty diet?  I was pretty disappointed to see that it takes her weeks to digest even the smallest fly.  It's also not so keen on hunting herself, so sometimes I throw her an odd fly that pisses me off once too many.  She even got a tiny bit of sausage the other day (not inside the pitcher!  On the ground!).  Seemed to like it :).

Thursday, 24 March 2011

Welcome to my garden!


I simply couldn't wait any longer, I'm dying to introduce you to my plants.

Pictured above - nursery part of my growing space (and my trousers, too!)
Maybe doesn't look like much but believe me, if I were to take a close-up of those pots, there's something happening in each and single one of them.  Some sprouts still require magnifying glass to be seen, but THEY ARE THERE!!!

The other section of my 'garden' is more green and leafy, dwells on the balcony, and I promise to post an image of it pretty soon. 

You can see for yourself that I'm a big supporter of cut-bottle-type pots.

Oh, and there's my little trick with name tags, too.  I needed something to show me what grows where, because before leaves all those pots look the same.  I tried nail polish, but no joy, it's still not visible against black background of the soil.  You could cellotape paper tags on the containers, but since I didn't have any tape handy, I needed another plan.  I found some beach pebbles (that few months back held Christmas tree in place - nice career for a beach pebble, heh?), wrote names on them with felt tip pen and simply placed them on the soil, taking care to avoid spots where plants would actually surface.  Works great so far!

Wednesday, 23 March 2011

Other stuff


Imagine a checklist - what you need when you want to start growing some stuff.

It would probably look something like that:

- space
- container
- water
- soil
- seeds
- other bits and pieces

I have already shared my ideas for getting hold of some free containers and building up your seed store.  Now it's time to mention the rest.  All in one post, because at this stage of my gardening education I don't really have much to say :).

1. Soil
Easy one.  In spring, available literally everywhere (I've seen bags in shopping centres, DIY centres, at greengrocer's and probably in my local bookshop too - ok, I might've overdone it here.  But only slightly), in huge quantities and for next-to-nothing prices.  Too good an opportunity not to grab it - quality of this bought compost is usually decent enough so you don't need to worry too much about fertilisers for some time.  If you think otherwise, no big deal.  Get a shovel and dig it up.  As easy as that. 

2. Space
All depending on your circumstances.  Basically, plants need space and sun to grow.  So, a balcony, a windowsill, a next-to-the-window table.  I'm lucky enough to have a balcony, so as soon as my plants sprout leaves strong enough not to get broken by water droplets, out they go.  Works so far. 

3. Water
If you're a gardener of my type, you have it the hard way and need to water your plants yourself.  No rain on the windowsill!  And not that much on the balcony either.  I don't mind, I have one more reason to have a good look at my greens and get to know them better.  One thing I've learned the hard way so far:  your life-giving water can actually kill your plants.  If leaves are still teeny-tiny and delicate, a drop of water falling from above can crush them.  I've lost half of my rocket this way :(.  Remedy - learn to aim.  Pour your water directly on the soil, avoiding contact with plants.  Takes some precision, but at least your plants stay alive.

4.  All other bits and pieces
See, I'm still a beginner, so I'm probably not even aware how many things you need to make your garden grow.  I follow the simplicity rule, give them the very basics and hope for the best.  If any problems show up, I'll improvise.  I have a funny feeling that most of the stuff you supposedly need for your garden is needed only by sales people in order to stuff their pockets, not by you.  The rest is marketing rubbish.  I'm planning to learn what I can do without rather than what I need.  If you like this attitude - stay with me!  I will share my discoveries as I go.

Tuesday, 22 March 2011

Seedy story


Once you have something to grow in, you need something to grow from.
You need seeds.

In experimental garden, selection is pretty random.  In other words, I plant anything I can get hold of.  It adds spice to cooking, you never know what mixture you'll end up with. 

It will probably not look like an English garden, but I never meant it to. 

And (this makes me teeny tiny bit sad) some plants probably won't survive in this jungle.  Hell, survival of the fittest.  If they can live through my gardening, they will not fear even nuclear blast.

It also means that I don't need to be particularly choosy.  If anyone has some seeds to spare, I'm in the queue.

Birthdays (only your own, unfortunately) are wonderful sources of seeds for planting.  You never knew what to say when someone asks you 'What would you like to get?' - you know now.  Whether you prefer surprise mixture or a precisely planned list, it's up to you.  I went for the unknown.

If you're birthday is not bound to happen for another half a year or so, don't despair.  Gardening centres are painfully expensive, but at least you can choose exactly what you want.  You can also try hunting for online seed giveaways.  Hell, I may even do one on this blog once I polish it up!  I guess it takes some dedication - nothing came out of my hunt anyway - but anything's possible under the Sun.

If you have some spare seed - swap, swap, swap!  Most seed bags are pretty big if you think in windowsill gardening categories.  I just plant one thing to a pot, which leaves me with most of the package unused.  If any of your friends/neighbours/family shows any symptoms of garden fixation, it's time to attack them and compare resources.  If you have something they don't, and the other way round, you're settled and your collection's bigger. 

I still have some seeds left, so if you feel like swapping, here's one willing candidate!  Email me if you're interested.

See?  Told you it's easy :)

Monday, 21 March 2011

Question of container


Ok, the decision is made, we start growing. 

Then you bump against a question - IN WHAT???

The easiest and most expensive answer is to spend an exciting afternoon in a gardening centre.  You'll be bound to come home swaying under the weight of professional, proper flower pots (and with much lighter wallet, too).  Those usually look nice, but I can't afford them and I'm completely not sorry.

I prefer to employ some imagination and use whatever I already have. 

As mentioned yesterday, garbage bin is a wonderful source of functional, original flower pots.  At the early stage of fixation, I developed some kind of pot-fever, looked at every single piece of rubbish as at a potential container and probably was overdoing it a bit.  More than a bit.  Now I'm almost recovered and I can share with you this list of 'potty' ideas: 

- plastic bottles - you know, coca-cola and the likes.  2 litre size works best for me.  Cut in half, make few holes in the bottom and that's it.  You have a brand new, cost free pot.  You're also recycling, and it's devilishly fashionable these days. 

- yoghurt pots - the bigger ones, anyway.  Principle is the same, pierce the bottom to allow water drainage, full stop.  You don't even have to cut anything. 

- milk cartons - to be honest, I haven't tried this one yet, because I'm running out of windowsill space anyway, but I have a feeling that it would work just fine.  If it holds liquid, it will hold moist soil too.

- builder's buckets - this one is for bigger plants, or for bigger batches of small ones.  You can buy them really (and I mean REALLY) cheap in DIY stores.  Also, paint buckets, or any-funny-building-stuff-that-comes-in-buckets containers work great.  Check with your neighbours whether they're not doing some decorating soon!  Just wash them well, some of those substances can be pretty vicious.

- cake boxes - as long as they are plastic.  I swear, I have a batch of strawberries growing happily in a box that once held carrot cake...

Basically, anything waterproof, roughly box-shaped will do.  If you're ambitious, you can beautify them with paintwork or some such.  I'm not, so I will leave details to your imagination.

Tip - trying to cut holes in plastic containers may be dangerous business.  Too easy for the blade to slip right onto your finger.  Warm the blade up in a candle flame and it will slice plastic like butter. 

Feel free to use your own imagination to come up with more ideas. 

Sunday, 20 March 2011

Where to start?


Let me tell you a secret.  First, I got the idea of starting a garden and only few weeks later I got another idea of starting a blog about it.  Conclusion - I already have the very basics covered and some plants showing green leaves.  But beginning the whole adventure was real fun, so I'm going to time travel a bit and go through it again, even if only virtually. 

So, how do you start?

The first (and probably the most important!) step is to actually decide to go ahead and do it.  Do I sound ridiculously obvious here?  Weeeell... 
Possibly, there are some illustrious people out there, who simply wake up one day with an idea in their heads, get up and make it a reality.  Could be.  Me, I'm not one of them.  I've been secretly dreaming of a garden for months.  But come on, a garden in a flat, in the middle of a city?  So I kept reading those gardening blogs, salivating at the sight of onions, tomatoes etc, and hating all those lucky people having backyards or enough balls to commit themselves to a garden. 

Took me good half a year or so to say 'what the hell' and start DOING something to actually have a garden, instead of only dreaming about it. 

Admittedly, arrival of spring in just the convenient moment helped, too. 

What I'm trying to say here is simple - if you dream of growing your own food, stop dreaming.  Get up and do it.  Whatever your circumstances are, it's much easier that it seems and it's much better than dreaming. 

I'm not saying that I'll have my own veg stall in the market at the end of this growing season, or that now I can safely forget where my greengrocer is.  Miracles are not covered by this blog.  It will probably be months before I taste any decent fruit of my gardening activities and even that is not guaranteed.  My crop is in constant risk of failing due to multiple hazards, not the least of which are my complete lack of experience or shaky sense of responsibility and commitment.  I bet I'm not the only one out there with such an attitude.

So why bother?

- for the pure fun of mucking around in soil and getting your hands dirty
- to satisfy your sense of curiosity - ever wondered why this blog has 'experimental' in the title?  All of my gardening works on 'Let's do that and see what happens' basis.  So refreshing.
- to learn.  Well, maybe my parsley won't grow once, twice, whatever, but it will eventually, right?  And even if it won't - at least I will know what kills it!
- to enjoy this wonderful feeling of creating something out of almost nothing.  My garden is built on 'minimum expenditure' rule.  Unbelievable how much of your garbage can begin new life as a planting pot.
- for the wide-eyed fascination when something you've planted actually grows, develops, thrives because of your care.  I don't want to get too cheesy or too sentimental here, so someone shut me up please.  But watching a seed grow is a powerful reminder of how miraculous life is. 

I could probably think of more, but this post has already grown into quite a lengthy story, so let me stop here.

Enough of ideology anyway, time to jump to the equipment you will need.
Which will be covered in tomorrow's post.
Promise.

Saturday, 19 March 2011

Introduction

Welcome everyone.

I have to confess something - I got a bad case of gardenitis (known also as plant fixation or grow anything syndrome).  No idea where it came from but here I am, getting all worked up because of anything green and sprouting. 

There's few problems on the way to happiness.  I don't have a garden.  I don't have cash for fancy gardening toys.  I don't have any knowledge on how to make anything grow. 

Here's the story of how I'm getting rid of those obstacles.